Before reporting on the battle I think it would be useful to give a brief overview of the With Hot Lead and Cold Steel rules…..
I shall discuss firing, melee and morale as and when it occurs.
To quote the author ‘ WHLCS is a fast playing big battle game’.
Big battle is open to discussion as the rules for Division or Corps commands etc. are in the advanced rules section.
For those people who play Black Powder then the unit organisation will feel familiar with units being classed as Tiny ( infantry only) small, Average and Large with suggestions as to the number of figures or bases that define these sizes but of course you can determine this yourself based on collection/ organisation. Troops are also rated as being green, regular or veteran .
D10’s are used in the rules which I quite like as it gives more opportunity to ‘tweak’ things without having huge impact.
Your units each have a profile, so for example and average sized infantry unit would shoot with 6 dice needing a 6+ to hit, melee with 6 dice needing 6+, has a morale 7+ and a unit coherency (UC) of 18!.
The UC reflects the size of the unit and for every 6 hits a base is removed and the unit will then become the next lower unit so an average unit becomes small etc.
This will become clearer as I do the refight the one issue I had with this concept ( as you can accrue fatigue/casualties through fast marching etc) is that there is no mechanism for rallying hits off. I did ask the author about this and he acknowledged it was a conscious decision to keep the game moving - but I may introduce something to allow units to rally off some hits/fatigue.
Units are then organised into Brigades (3 or 4 regiments usually) and have a Brigade commander ( there are rules to give them a personality trait) the commanders play a key role which I like.
Each bound/turn is structured as follows:
1. Determine number of ADC’s ( each player rolls a d5)
2. Determine initiative ( each player rolls a d10 higher gets to take their turn first - it can be influenced by allocating ADC’s)
Then the player with initiative follows the following procedure.
1. Rally phase
2Artillery phase ( player can chose to bombard with artillery. If they do they can’t fire in fire phase)
3. Order phase.
4. Firing phase
5.Melee phase.
So I quite like the idea of being able to bombard with the artillery before you order the brigades as the results of the bombardment may influence the orders issued.
So before starting the game one of the key elements in the game is the issuing of orders. Like in Black powder the player identifies what the Brigade commander will do with their troops, they can all do the same or be ordered differently, the brigade commander will make one command roll for the brigade success or otherwise will be based upon the most difficult order issued…… a natural 1 always fails and requires a roll on the unexpected event table. A natural 10 always succeeds.
A major change from Black Powder is that if the roll fails the units may still be able to do something so for example to order a unit(s) to double quick ( triple move) requires a 6+ to succeed whereas a QuickTime order ( double move ) requires a 5+ so if the player rolled a 5 he would fail the order to double quick but could still move his units a double move if they wished. These scores can be adjusted by the competency of the Officer, if ADC’s have been attached to the brigade etc. there are rules for brigade coherency and brigade formations.
Ok a bit of a long intro so let’s move onto the game…..
The scenario is taken from Brad Butkovich’s book Summer Storm. I turn is 30 mins and a base around 100-125 men.
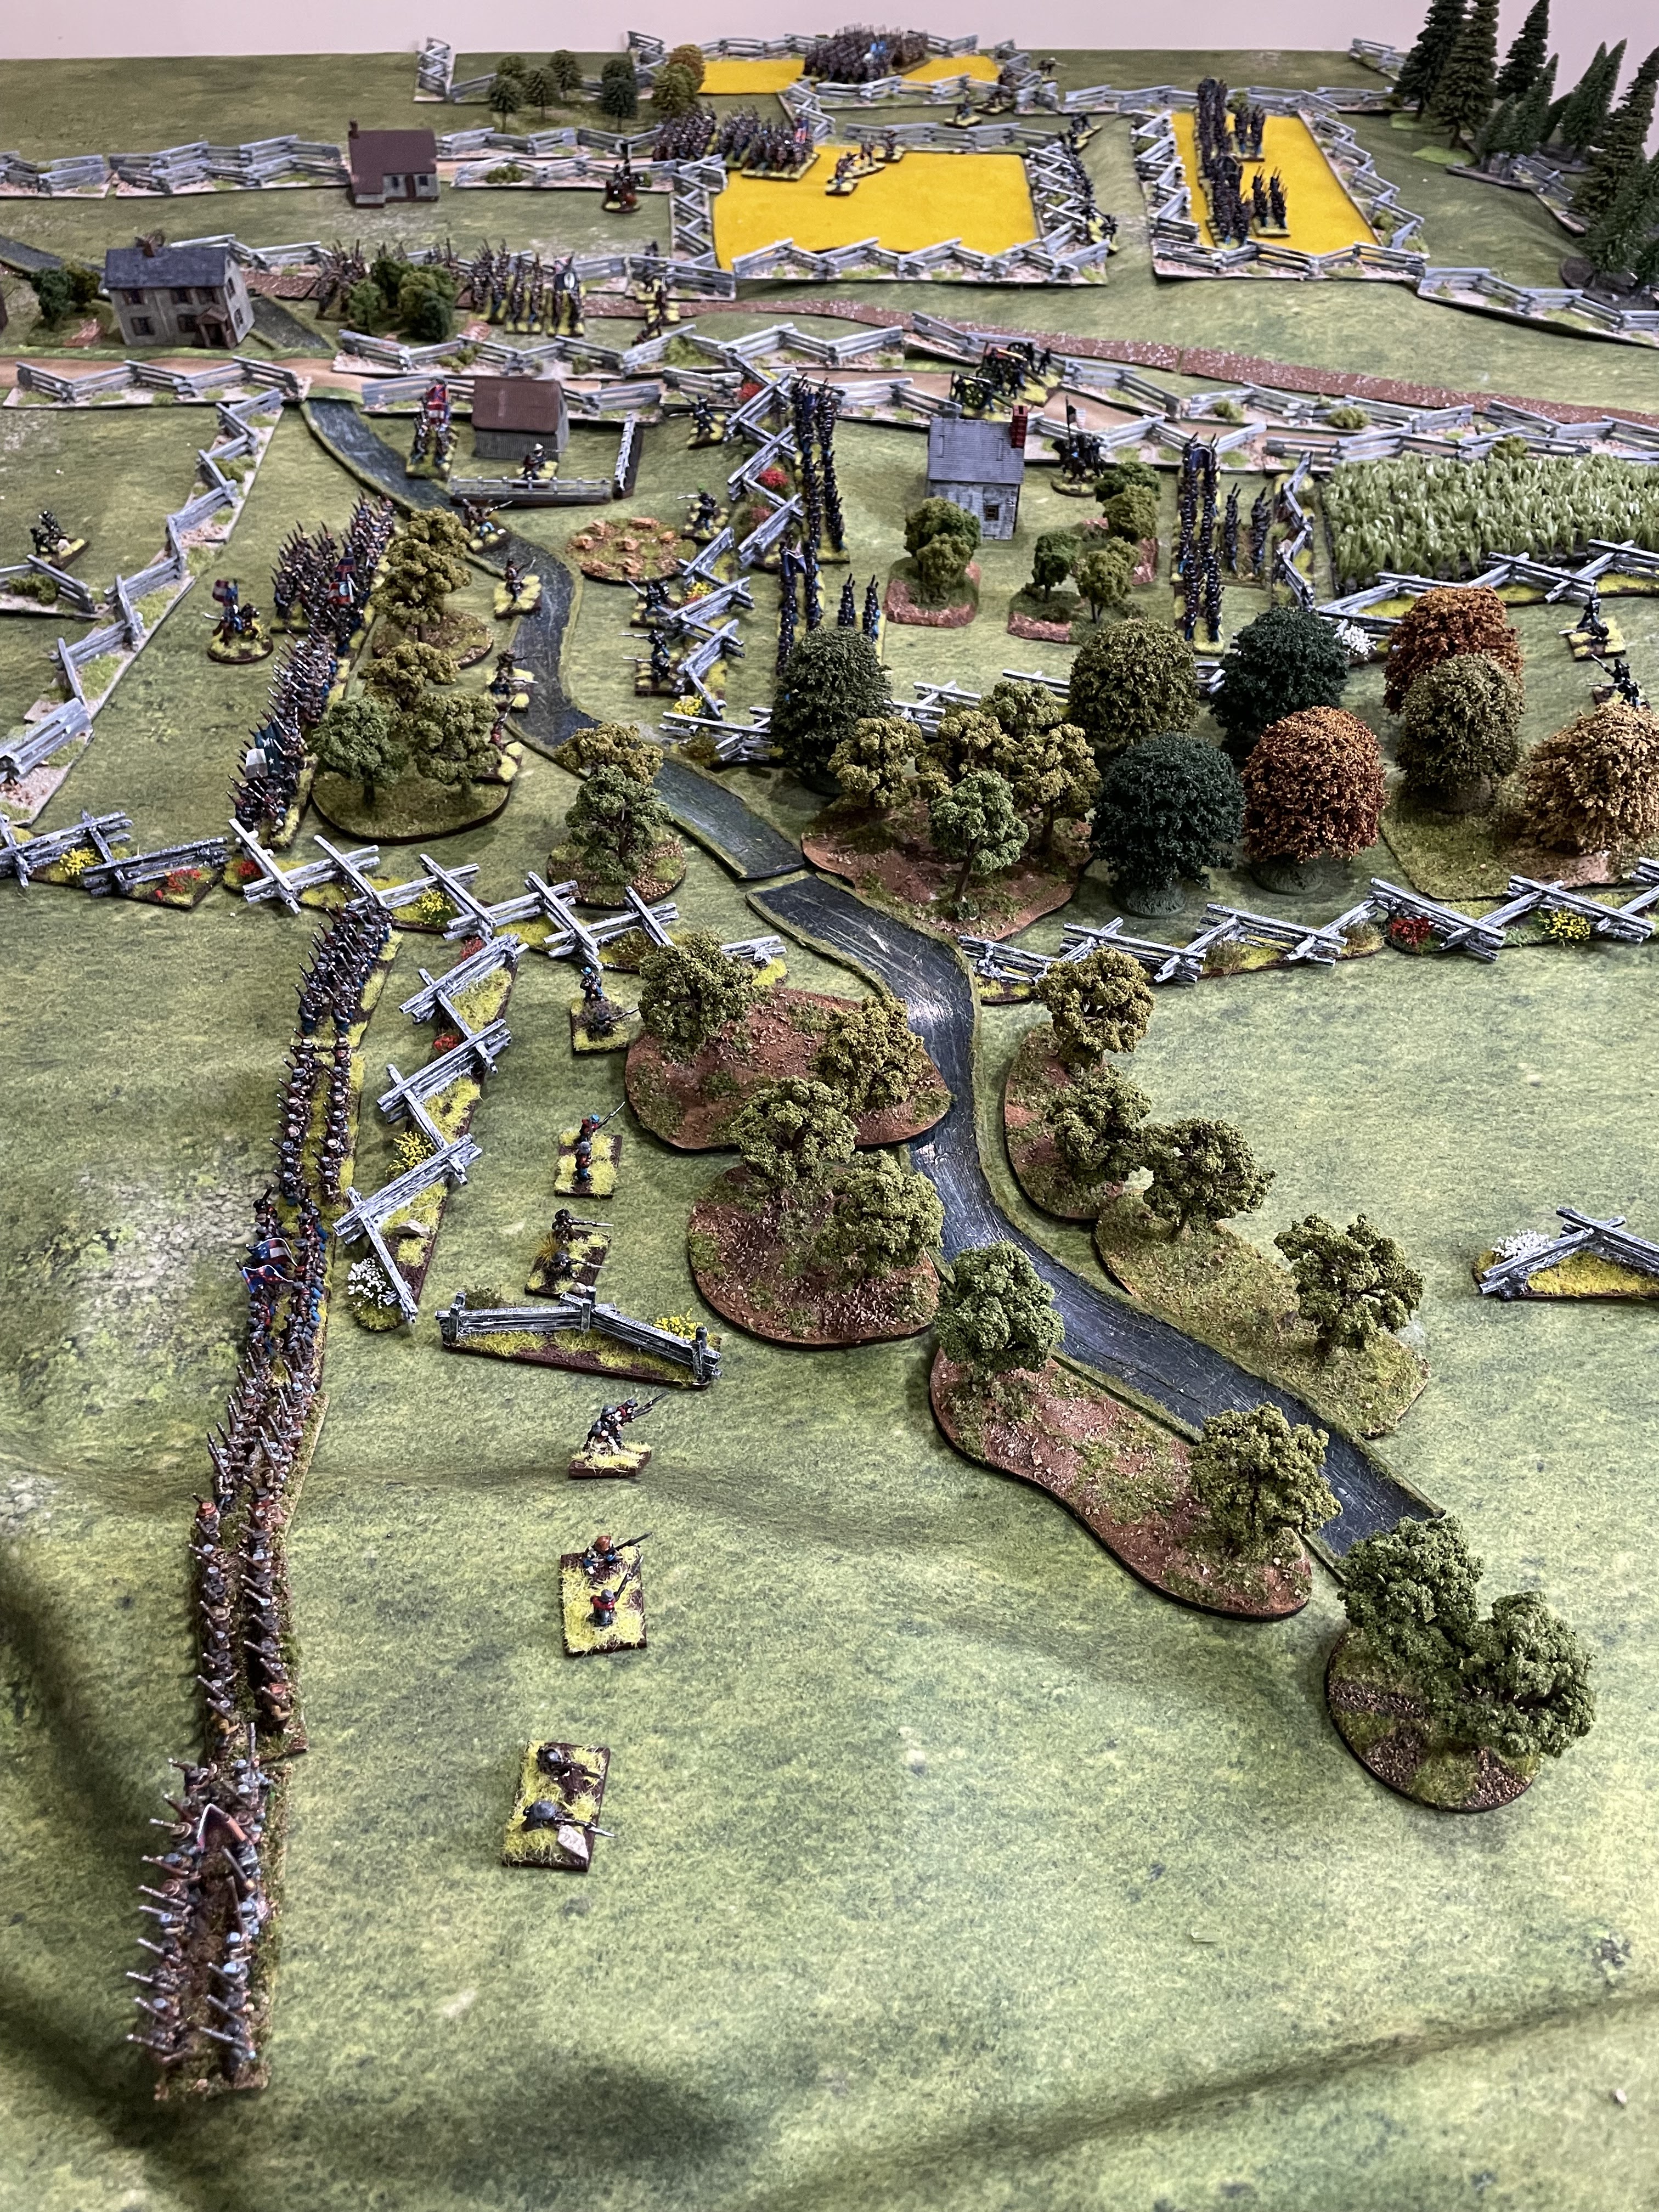
It’s easier to show the deployment map from the book - I aim to make labels for future games to make it easier when I’m playing to identify units and their rating.
In the photos below the Confederates are to the left which equates to the top of the map above.
Photo below shows the Iron Brigade deploying in strength on the Union left flank.
So 10.30 am Bufords cavalry have withdrawn as the Confederate Brigades of Archer and Davis press forward as they seek to take the high ground of McPherson’s ridge. Facing them are elements of the Union 1st corps.
Cutler’s brigade is deployed around McPherson’s farm and extends along the ridge line to the right.
Just arriving on the battlefield is the 1st Corps commander John Reynolds and he accompanies the 1st Brigade better known as the Iron brigade..
Each bound starts with each side throwing a d5 for the number of ADC’s they receive for the bound Union 3 Confederate 1 in addition Reynolds adds a further d5 on this occasion 1. This will give the Union and edge throughout the battle in either using the ADC’s to try and seize the initiative or to ensure the issuing of orders is a success ( in this first attack there was no Confederate divisional or Corps command present)
The Union win the initiative and allocate 2 ADC’s to each brigade commander. The Union artillery opens fire on 42nd Mississippi and fails to inflict any casualties. Cutlers men all hold their position their skirmishers move forward to engage their opposite number ( skirmishers don’t need orders to move)
Reynolds and the Iron Brigade advance steadily again pushing skirmishers forward to engage the enemy.
Skirmishers exchange fire both sides taking hits but all pass morale. ( hits on skirmishers are not retained it’s purely to force a morale test…. Failure of which results in skirmishers rejoining parent unit.
In response the Confederates attach their one ADC to Davis.
They have 5 batteries of off board artillery all of which count as firing at long range and are restricted as to the area of the battlefield they can fire at… they can only fire in the bombardment phase.
Three batteries fire at the 76th New York on the ridge line and score 2 hits, two batteries fire at the 95th New York in the McPherson farm area and again score two hits.
Davis orders his brigade to quick time towards the ridge and then start to deploy into line he passes his order test and the men move forward
Archer just orders his men to advance steadily forward and again succeeds.
Bound 2 11am.
ADC’s Union 5 Rebs 2 and Union win the initiative.
Iron Brigade are successfully ordered to quick time forwards.
Cutlers ordered his artillery to manhandle back down the pike, the 147th are ordered to cover the flank of the 95th and the skirmishers withdraw back to their parent units as the Confederate troops are now too close. (Skirmishers must retire if enemy move to within 6” /cm.)
Within the rules if you fire on an enemy unit they can return fire but cannot then fire in their turn that bound.
The 95th and 84th New York exchange fire with the 5th Alabama and 1st Tennessee. The New York regiments are both veterans and inflict 4 hits each on their opposite numbers likewise the return fire inflicts one hit on the 95th and 4 on the 84th.
On the McPherson Ridge line the skirmishers continue to exchange fire and inflict hits on each other on this occasion they both fail their morale and the skirmishers retire to their parent units..
During the Confederate turn the artillery fire onto the 76th New York and 56th Pennsylvania inflicting a hit on each.
Both Confederate brigades are given orders to advance and fire.
In Davis’ brigade the 42nd Mississippi have moved to the road side above the railway cut and unleash a devastating volley on the 147th New York. In the rules the roll of a natural 10 at close range causes 2 hits and at point blank causes 3 hits they rolled 3 tens and inflicted a total of 9 hits ( morale test due to loss of base required)
Likewise 2nd Mississippi and 55th North Carolina engaged with the 76th and 56th hits are exchanged but the 56th take 5 which is a base lost. Morale tests result in the 56th and the 147th becoming unnerved ( fall back in disorder)
The Union are starting to feel the effect of the early Confederate attack. The Union need to win the initiative next turn to prevent the Rebs capitalising.
Turn 3 11.30
ADC’s 5 Union 1 Confederate
Union place 3 ADC’s to initiative roll and win 9:6
Both rally roles on the 56th and 147th fail and they now retreat a further 12cm to the rear ( another fail they will rout off board)
Cutler seeks to give a Brigade order to withdraw and fails, he is allowed to re roll but only for 1 unit so he orders the artillery to be manhandled back.
Reynolds seeing the threat to Cutlers Brigade he orders 2nd Wisconsin to advance towards the farm and the 6th to quick time along the ridge top to sweep down again to the farm are, the remainder of the brigade to press forward and engage Archers brigade.
All along the line from McPhersons farm and along Willoughby Run there is a heated exchange of fire with casualties been taken on both sides.
The skirmishers along the Willoughby run have had enough and rejoin their parent units. The tiny unit of the 5th Alabama is destroyed by the 95th. The 84th and 7th Tennessee both lose a base and will need a morale test.
The 76th New York gets the worst of the exchange with 2nd Mississippi and lose a base requiring a morale test.
In the morale tests both 7th Tennessee and 76th New York fail, become unnerved and fall back.
In the Confederate turn the 7th Tennessee rallies, Davis fails his command roll and his troops stay in position Archers men press forward onto Willoughby run.
The Confederate batteries do not have a target,
The 42nd Mississippi are behind the flank of the 95th New York and inflict 3 hits the 95th fails its morale test and as it is now a tiny(1 base) unit it is removed .
Elsewhere again hits are being exchanged the Iron brigade make their presence felt inflicting a base loss on the 1st Tennessee and 13th Alabama. The 13th fail their morale test and fall back.
Turn 4 Noon.
ADC’s Confederates 5 Union 8.
Union yet again desperate to win the initiative to prevent the Confederates breaking through .
They add 4 ADC’s to the die roll and win 8 v 7 ! Close.
Rally tests results in the 76th panicking and retreating. Luckily the 56th and 147th rally the Union battery fails to hit its target. The 84th begin to withdraw through the orchard,
The Iron Brigade continue to press forward and the only firing is the 7th Wisconsin on the 1st Tennessee they score an incredible 7 hits and receive 2 in return. The 1st Tennessee is now a tiny unit they fail their morale and are removed.
In the Confederate turn 13th Alabama rallies but Archer seeing his brigade disappearing before his eyes and his remaining units taking heavy casualties orders the remaining troops to withdraw behind the fence line close to their arrival point.
Davis’ brigade is largely unscathed and he wishes to press the attack although 2 of his regiments are Green they are large units and carry a punch so the 55th advance into the field previously occupied by the Union, the 2nd Mississippi begin to wheel to flank what’s left of Cutlers brigade and the 42nd cross the road and start to enter the farm area.
There is no firing.
Turn 5 12.30
ADC’s Confederates 2 Union 6
Again Union use 2 ADC’s in an attempt to keep initiative and succeed.
They fail to rally 76th New York and they are removed from the table.
Cutler s brigade is almost spent and are desperately trying to hold on until Iron brigade relieve them. Both the 147th and 84th fire on 42nd Mississippi and and cause 5 hits receiving 3 in return.
The Iron brigade push over Willoughby run, the 2nd Wisconsin starts to enter McPherson farm and the 6th is starting to move behind the 147th.
Cutler actually threw a 1 on his order dice and failed his command roll which then required a throw on the and on event table, the result was his troops were required to shift to the right which was effectively what he wanted to do!
In the Confederate turn Davis decides on one last push the 42nd are ordered to charge the 84th whilst the 2nd and 55th advance and fire.
The order to charge succeeds when a unit charges the receiving unit is forced to take a morale check if it succeed it can stand and fire or orderly withdraw. However the 84th failed and became unnerved and retire disordered. The 42nd do not have sufficient move to make contact with either the 84th or the 2nd Wisconsin!.
So we move onto penultimate move Turn 6 1.00 pm
Despite allocating 3 ADC’s to the initiative roll the Union for the first time fail to win and the Confederates can move first.
There are no units to rally.
Archers men are now safely behind the fence line watching the dense masses of the Iron brigade start to form up beyond Willoughby Run.
Davis having committed the 42nd now realises unless he acts decisively they will be surrounded so he orders them to charge again on this occasion the order fails!
Over the bound the exchange of fire between 55th North Carolina and the 56th results in both units losing a base and taking tests. Both fail the 55th retire disordered and the 56th is removed from the table ( tiny unit ) .
There is heated fire exchange in the McPherson farm area but the deciding fire comes from the 2nd Wisconsin who fire on the flank of the 42nd Mississippi they lose a base and have to take a morale test which they fail and are forced to retire disordered.
The 84th failed their rally test and retreat panicked.
At this point although there was only 1 bound left I called a halt.
On the Confederate side Archers brigade was spent his 3 remaining regiments had all taken casualties and all they could do would be to try and hold against the inevitable assault by 3 very strong regiments of the Iron brigade.
Davis’ brigade has seen both his green regiments unnerved although there is a reasonable chance he could rally them using ADC’s but his moment to attack has passed as two regiments of the Iron Brigade will secure the McPherson farm area.
For the Union Cutlers brigade is out of action with only the 147th and the artillery still in some condition to fight. However the Iron brigade is largely unscathed and will easily secure the centre of the field and will more than likely destroy Archers brigade if allowed.
So what do I think of the rules? I like them and they’re certainly worth another go. On the plus side I like the orders process and the use of ADC’s I didn’t use Generals characteristics but I can see them adding some nice chrome. Neither did I use some of the advanced rules ( rebel yell etc.)
I like the option with artillery to bombard before you issue orders and there are rules for different ammunition so shell may cause less casualties but has an impact on morale and there are rules for ball bounce through..
Formations etc all seemed to work well.
I think skirmishers still need some additional work I don’t understand allowing parent unit to fire through its skirmish line (I ignored this) and the tweaks I introduced came somewhere close to what I want. Neither are there any rules to allow you to rally off hits, a debatable point I think.
Finally and perhaps a minor one that is easily adapted Generals have an influence on rallying troops etc. but I can’t see anywhere where they can help in a morale test, if attached or close by it has no impact ?
Finally whilst playing I used the cm instead of inches however for the Command range I kept inches. A brigade commander has a command range of 10 as you can see from the photos if you have 3 or 4 units deployed in line it would be difficult for them all be in command range.
However all,of these can be easily worked on, I think if you like Black Powder you will like these and if you’re looking for a fairly fast paced game that I’m sure once played a few times will flow well.


4 comments:
Thanks Graham for a run through, these have been interesting me. Another blogger has had an initial run through and I was left wondering whether the rules are a mish-mash of other rules or whether they bring something new to the party.
I think those that dislike Black Powder tend to do so due to the turns that a unit can just waste sitting on their hands because of failed orders and these rules seem to provide a remedy for anyone bothered by that.
The dispersing of enemy skirmishers back to the parent unit when hit seems like a good idea.
Nice run through I will have to pick up a copy
This is brilliant stuff Graham - my compliments! You have managed to distract me (very happily) from my painting and decorating for an hour - for which my thanks (the cheque is in the post)!
I told you, you would like them Graham. Initially we didn't use the advanced rules and certain weapon categories, but they do give a good feel for the period. Being a rebel by choice, they can get a pasting from the Union artillery which again feels right but I just enjoyed how they worked. Definitely recommended.
Post a Comment